📄 Summary: What You’ll Learn in This Article
This article provides a detailed breakdown of the Details Module in Marmind, explaining each panel's function and how to configure or use them effectively. You'll learn how the module adapts to different objects (campaigns, projects, actions), how to set operational goals, and how to leverage custom panels to suit your organization’s unique needs.
-
Overview of each section in the Details module
🧑🤝🧑 Who Should Read This?
This article is most useful for:
-
Marketing operations managers
-
Marmind admins and power users
-
Campaign planners and project managers
-
Marmind consultants and implementation partners
✔️ Prerequisites: What Should You Know Before Getting Started?
Level: Beginner
Access required:
-
Appropriate object permissions (e.g., campaigns, actions, projects)
-
Admin access required for panel setup, key figure definitions, or custom panel creation
-
Basic understanding of Marmind’s object hierarchy and familiarity with campaign setups is required.
Details Module: Overview
For a more general overview of the details module, please find an introductory article here: https://knowledgebase.marmind.com/kb/details-module
The panels displayed in the Details section vary depending on the type of object selected in the object tree. Default panels can be managed and customized in the Admin Settings:
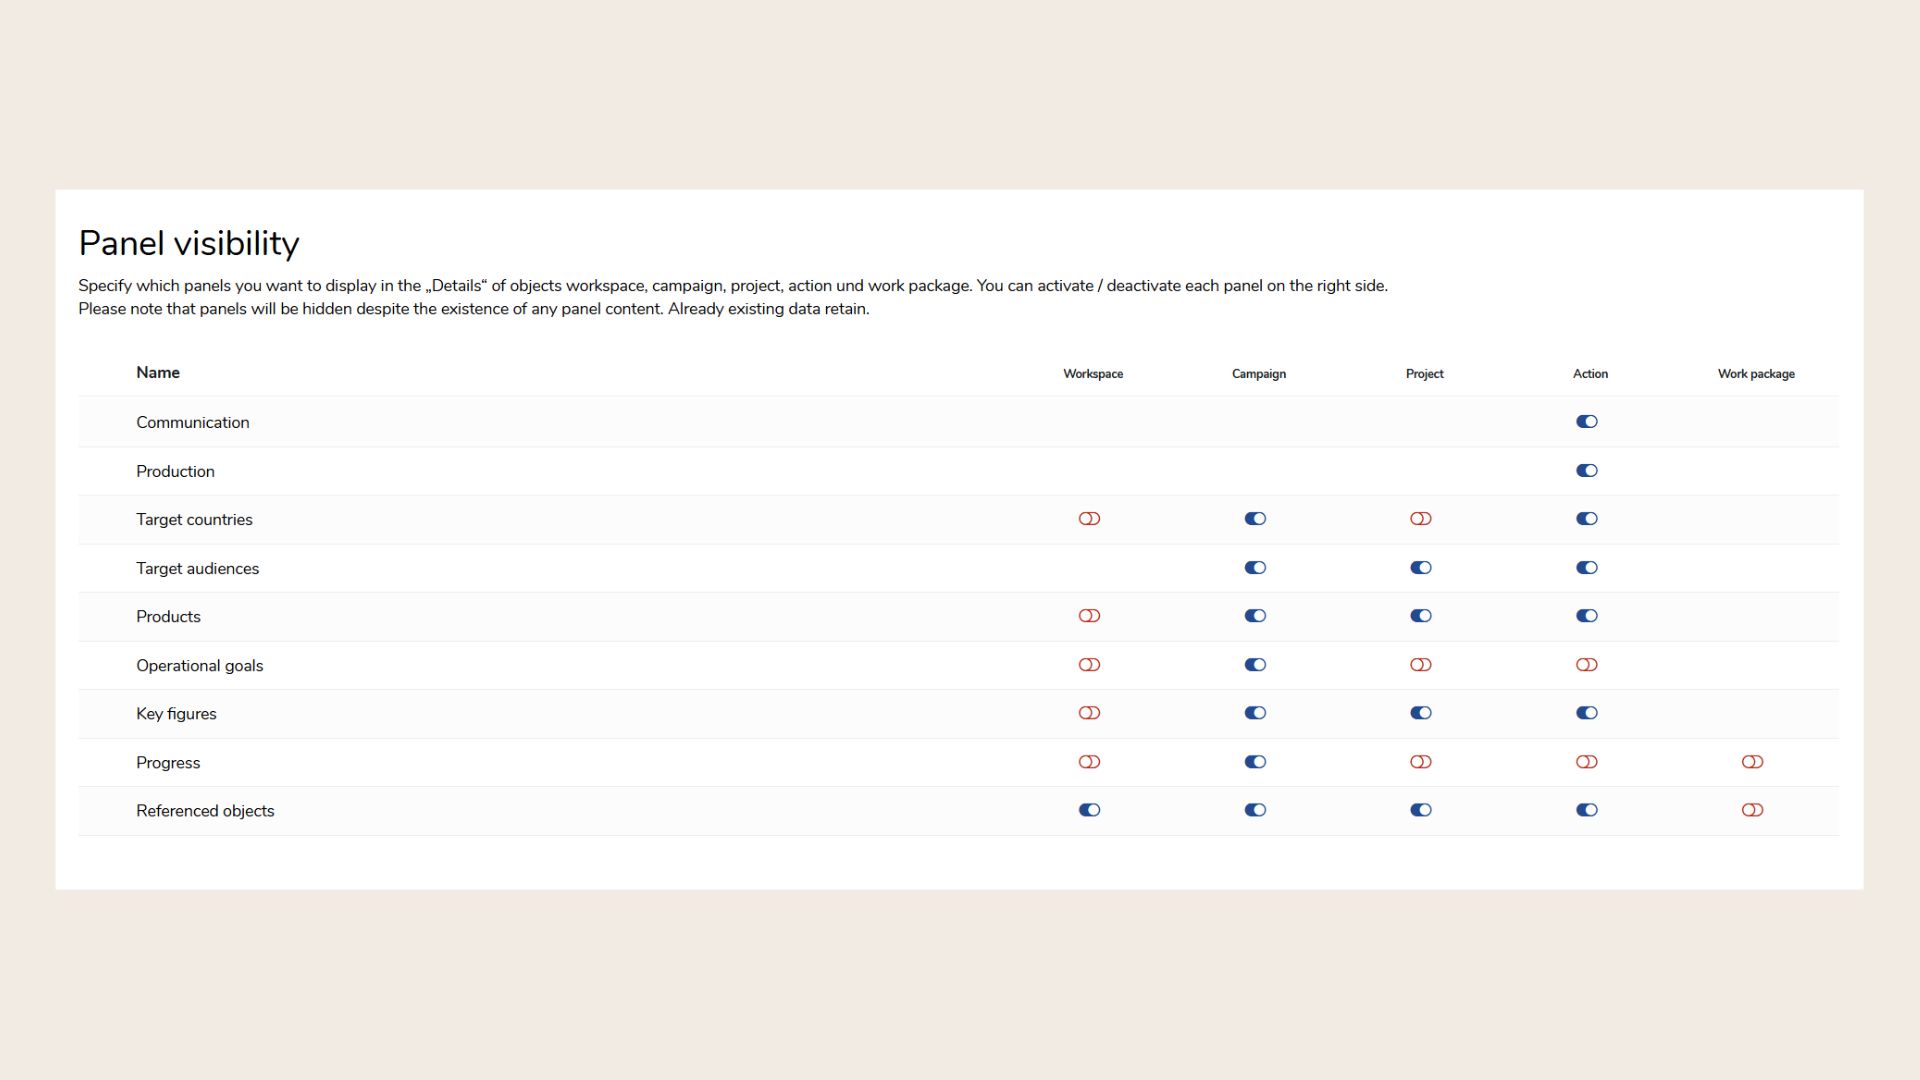
Note: Additionally, your organization may have custom panels configured specifically to support your unique processes and data needs.
Microsoft Planner Connector
Please note that this connector is not enabled by default and may require manual activation. Visibility depends on user permissions and configuration
The “Microsoft Planner Connector” panel allows you to link Marmind with Microsoft Planner. Once connected, it can import tasks (To-Dos) from Planner directly into Marmind, enabling a more streamlined workflow across platforms. The depth of integration may vary depending on your setup. For more advanced use cases or setup support, please contact your system administrator or reach out to a Marmind consultant.
Target Countries
The “Target Countries” panel allows you to define which countries are relevant for a specific campaign, project, or action. You can assign each country a priority level to reflect its importance. Countries can also be grouped into custom regions (e.g., "DACH" or "EMEA") in the system settings, enabling more efficient selection and filtering. These groupings can be visualized on dashboards using color-coded world maps, depending on your configuration. This feature helps localize campaign planning and supports regional targeting strategies.
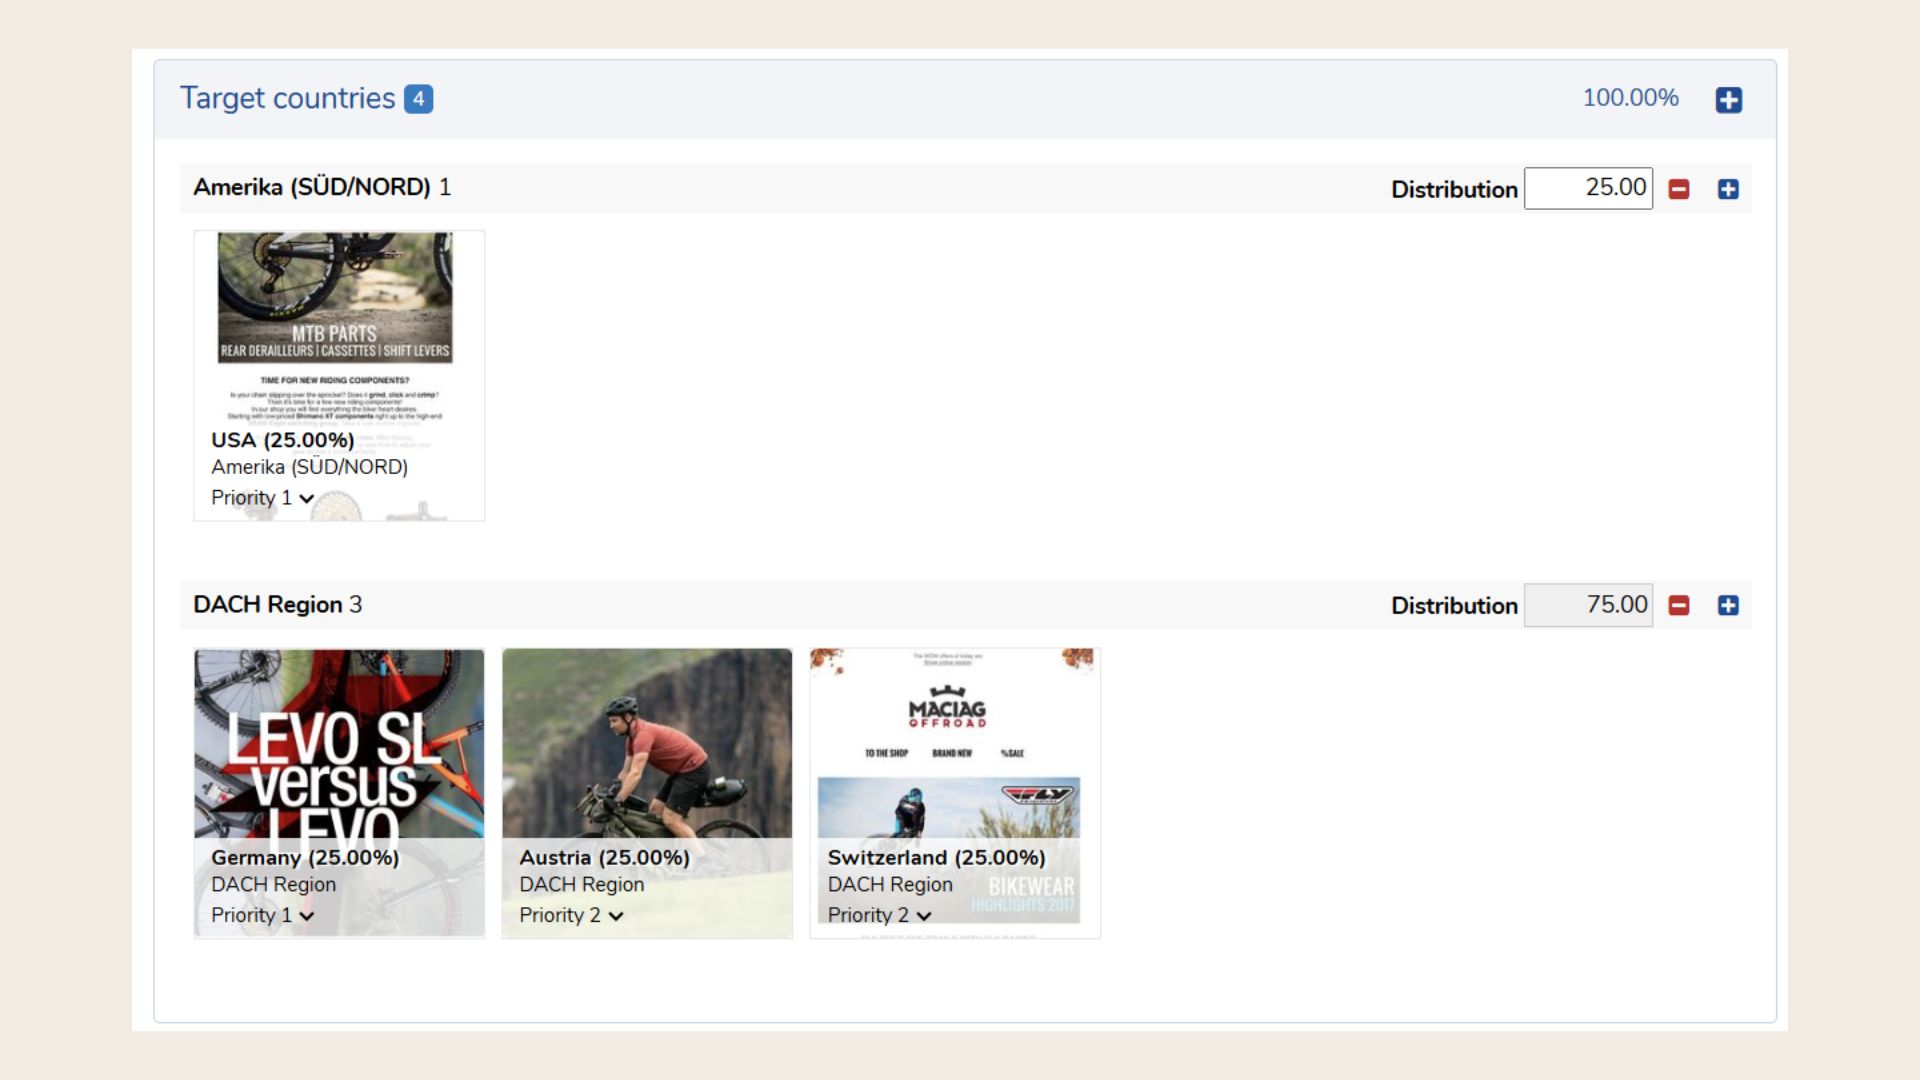
Note: Target countries, audiences and products may be named differently in your specific Marmind instance.
Target Audiences
The “Target Audiences” panel lets you define and manage the specific groups your campaign or project is targeting. Each audience must be assigned to a Target Audience Type (e.g., "Existing Customers," "Prospects," or demographic groups like "18–25 year olds"). These types act as categories to help organize and filter your audiences.
This structure allows you to create and manage multiple audience segments efficiently, ensuring consistent targeting across campaigns. Descriptions, annotations, and scenario tags can be added to provide further context.
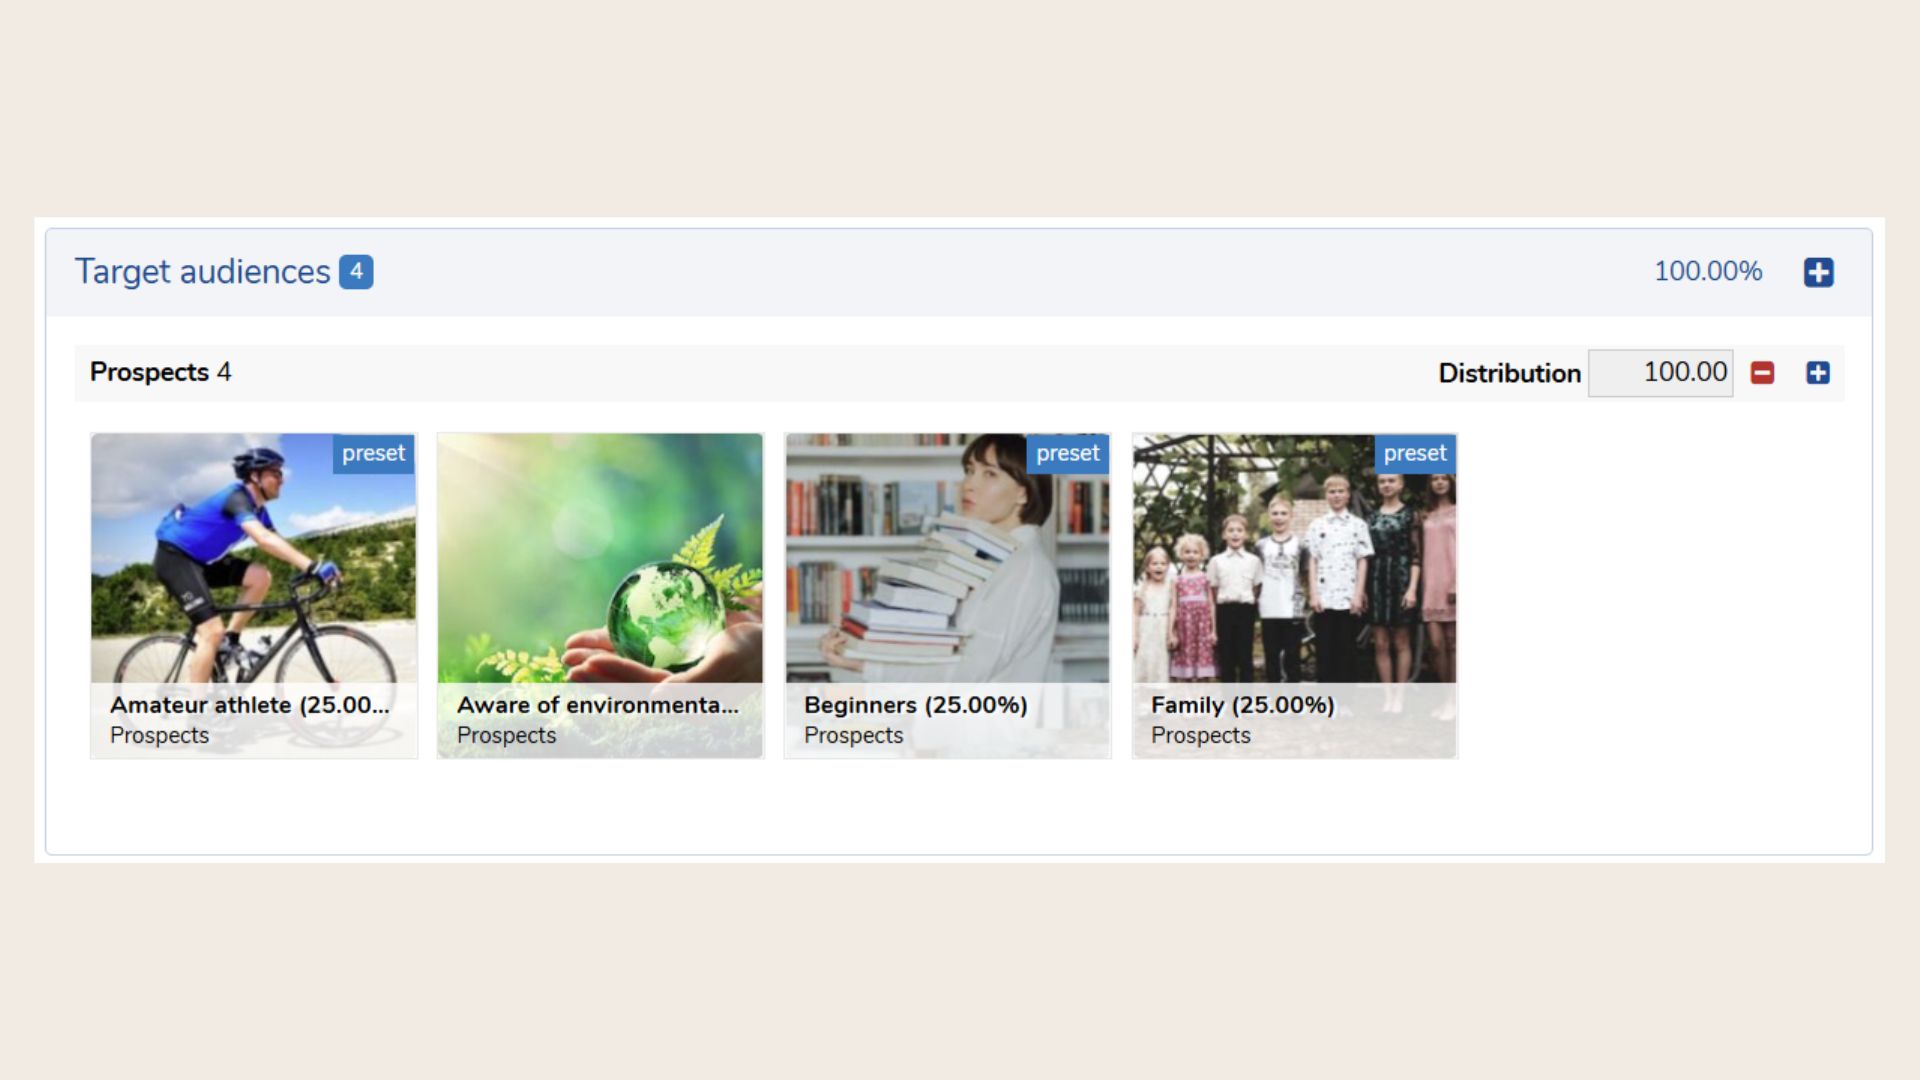
Tip: Setting Target Audiences can help you on multiple levels: filter according to target audience in the Budget & Cost module or create a smart chart in the Dashboard module for quick and easy insights.
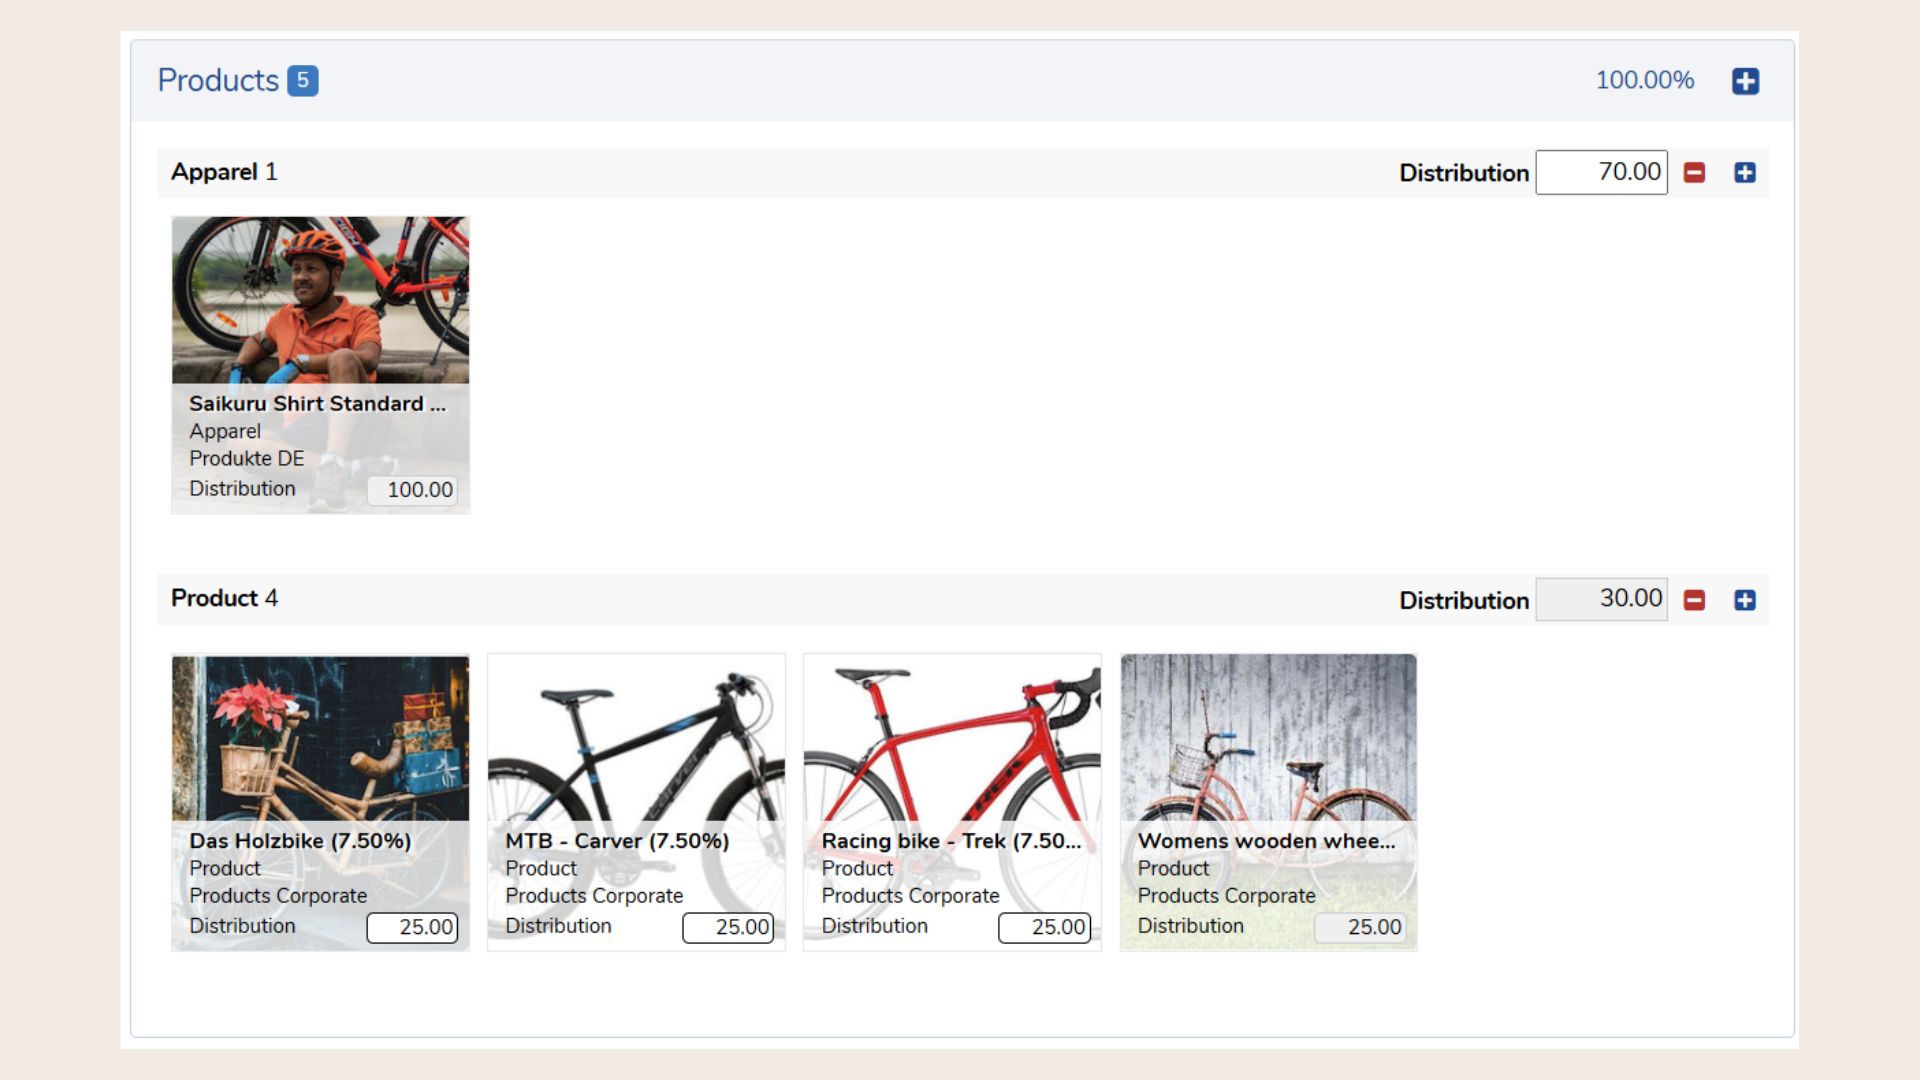
Products
The “Products” panel allows you to define which products are associated with your campaign, project, or action. Products are structured across four dimensions: Product Categories, Product Types, Products, and Product Shapes.
This flexible setup enables you to reflect any product hierarchy - from broad categories (e.g., "Clothing") down to specific items (e.g., "Short-sleeved T-shirt in red"). You can customize these dimensions to match your business structure, ensuring that marketing activities are accurately aligned with your product portfolio.
Operational Goals
In Marmind, you define measurable goals for your marketing efforts. You can capture these at all levels. Operational objectives can be formulated individually in the context and clearly defined with a predefined goal value unit (e.g. "paragraph target Q3" with goal value unit "paragraph"). The goal value units must be defined in advance (admin user) in the settings (see chapter Goal value types).
Create and maintain operational goals
In the detail area, open the "operational goals" panel and add a new operational goal by clicking on "+".
Define the goal with name and type, and also select a "strategic goal" to assign operational values to it and evaluate them in reports (for example, multiple operational goals provide values to achieve a strategic goal). Also assign a value for "goal target" and save the operational target.
The operational goals thus recorded are displayed in alphabetical order in the panel. With the creation of the goal, the corresponding key figure(s) is automatically created in the same marketing context (as defined in the settings).
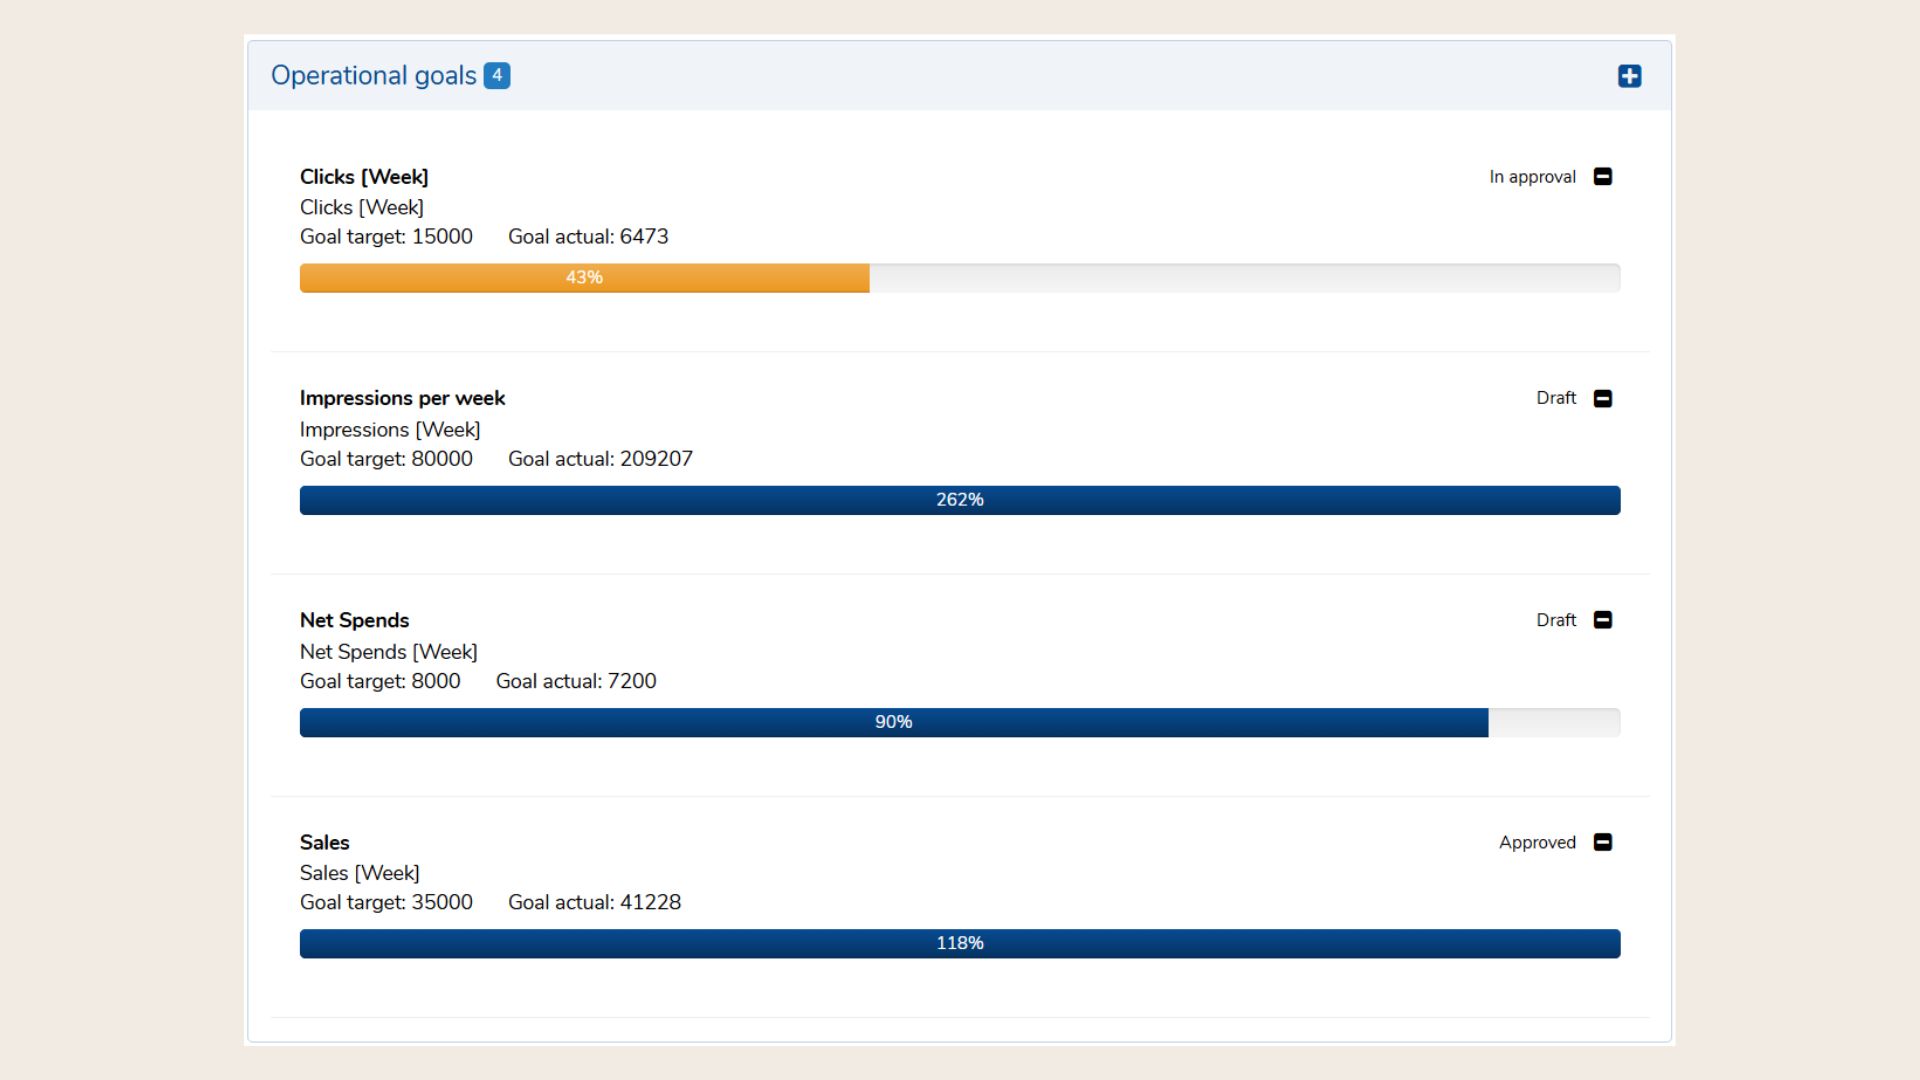
Recording of target and actual values
You can directly enter target values in operational goals (e.g. sales goal Q4: 35,000).
Since each goal value unit is also connected to a key figure (the combination goal value – key figure is defined in the settings), the input of actual values takes place directly in the corresponding key figure(s) in the marketing context and cannot be changed in the operational goal.
Thus, with only ONE operational target, the values of ALL associated key figures can be used as an actual value in a context – with the function "include key figure values of all levels".
Example: The operative target at campaign level (target target) is "10,000 clicks". The campaign has 10 actions that measure clicks. The actual value of the campaign is now automatically formed from all key figures of type "clicks" within the entire campaign structure, including all underlying actions.
This allows you to form totals or averages of all actual values of key figures of the same type from a hierarchy in operational objectives.
Inheriting operational goals
To automatically distribute operational goals to the lower level in a marketing structure, select the “inherit operational goal” option. This automatically inherits the target to all marketing objects that you create under this level. This applies to all newly created sub-objects from activation, but not automatically retroactively to existing ones.
In addition, you can decide whether the target value (e.g. "30000") should also be inherited when inheriting operational goals.
Key figures
With Marmind you have the possibility to record and evaluate key figures per work area, campaign, project and action. In order to be able to add key figures to the object, they must have been created in advance by an admin user in the settings.
Adding key figures to objects
In the detail area, open the "key figures" panel and set a key figure by clicking on "+". In the pop-up, select the desired key figure from the list of key figures - the corresponding grid appears – and, for example, assign a planned value directly. The key figures thus recorded are displayed alphabetically as tiles in the key figures panel.
.jpg?cb=51b756eb4d8b7f61b894f31940a69ca9)
Note: Key figures offer various recording and costing options: Three attributes are assigned to the key figure, which affect the creation and maintenance of the key figure:
-
Unit type: Determines the unit (number, EUR, percent, or duration)
-
Calculation Type: Specifies the calculation type (average values or totals)
-
Interval: Specifies the time units in which you can record planned and actual values (per week, month, quarter, year, or total)
In the key figure pop-up, a sum (or average) for plan and actual values as well as a forecast value is automatically calculated.
Progress
In the progress panel, you, as the controller, enter the most important key data to assess progress according to your perspective. Depending on the setting, you can record text notes or progress steps here, which can be converted into to-dos at any time. This helps you to keep an eye on your milestones.
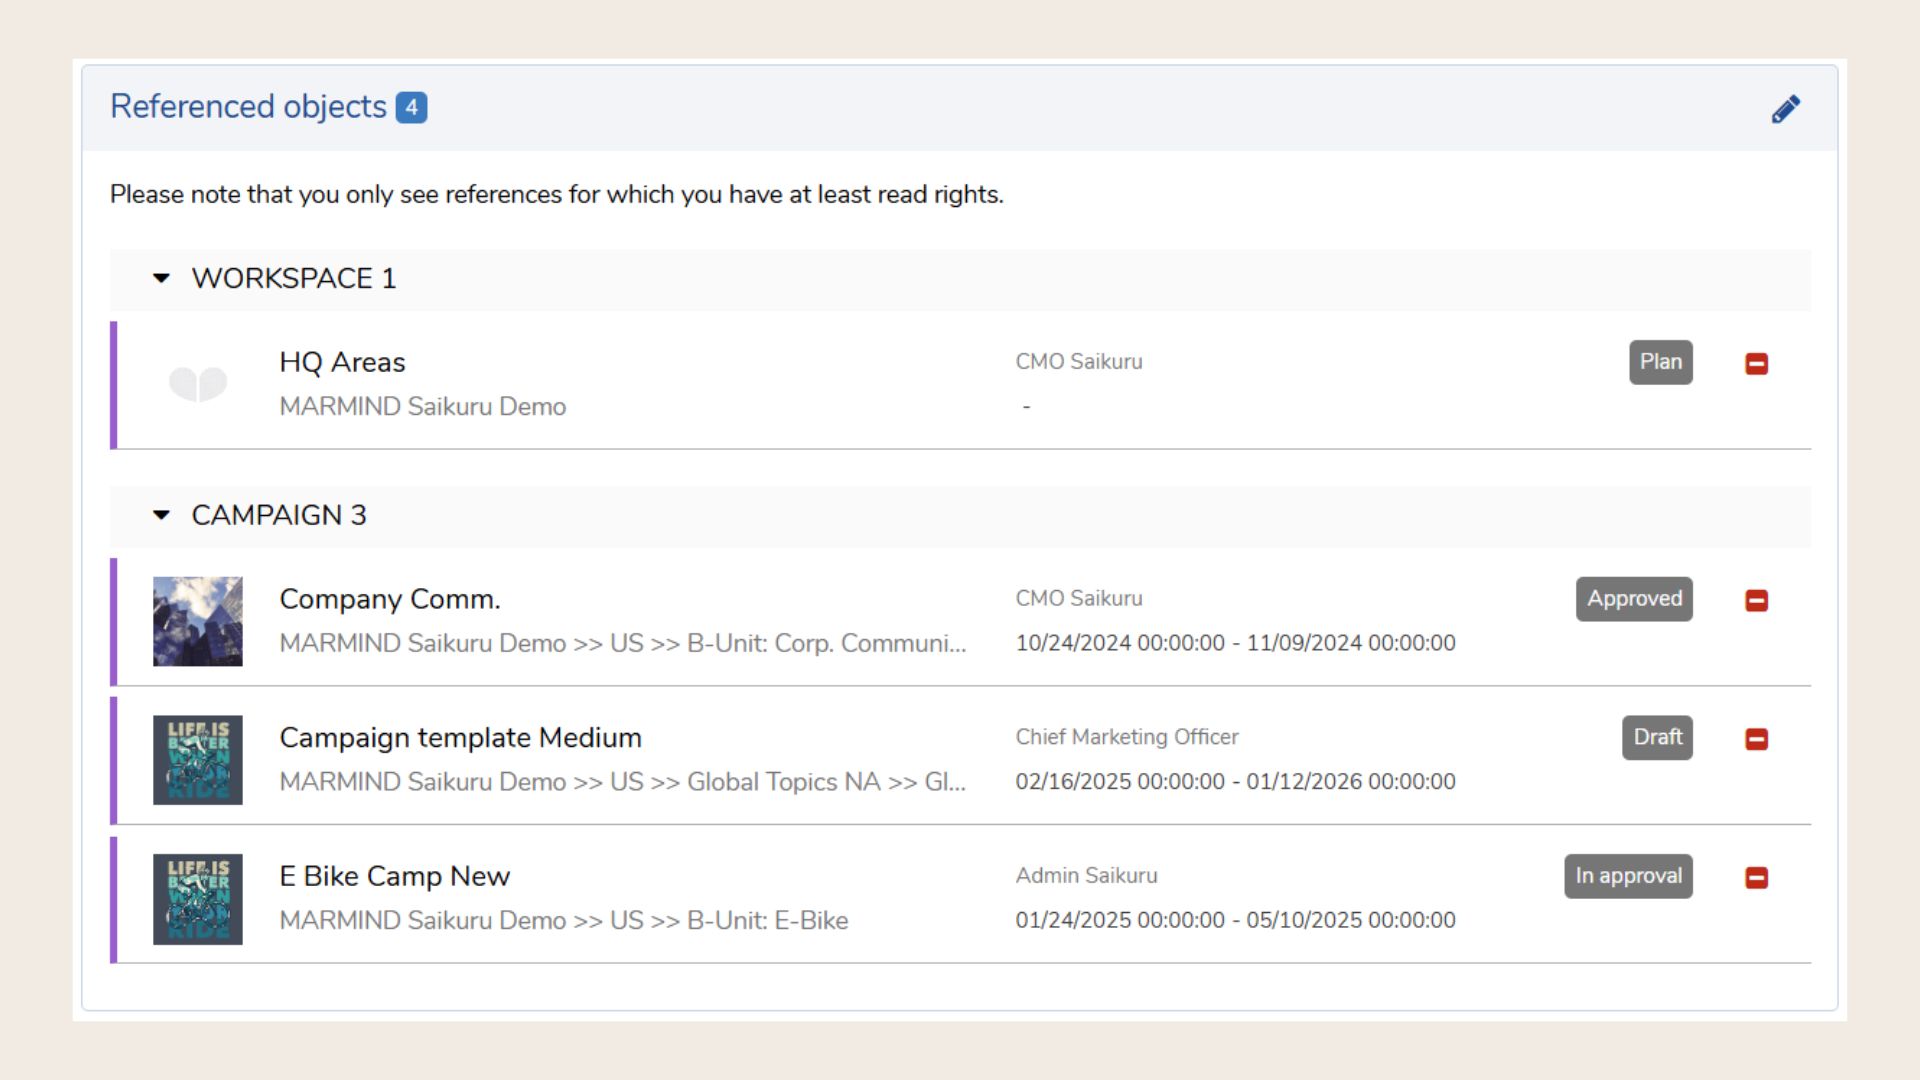
Referenced Objects
The “Referenced Objects” panel lets you create links between related Marmind objects (e.g., campaigns, projects, actions). This functions like a shortcut, allowing you to quickly navigate between connected items, even if they are stored in different folders or workspaces. You can search for and select the object you want to reference (using names or MMIDs) and it will appear as a clickable link. This feature is especially useful for managing dependencies or visualizing how different elements are related across your marketing structure.
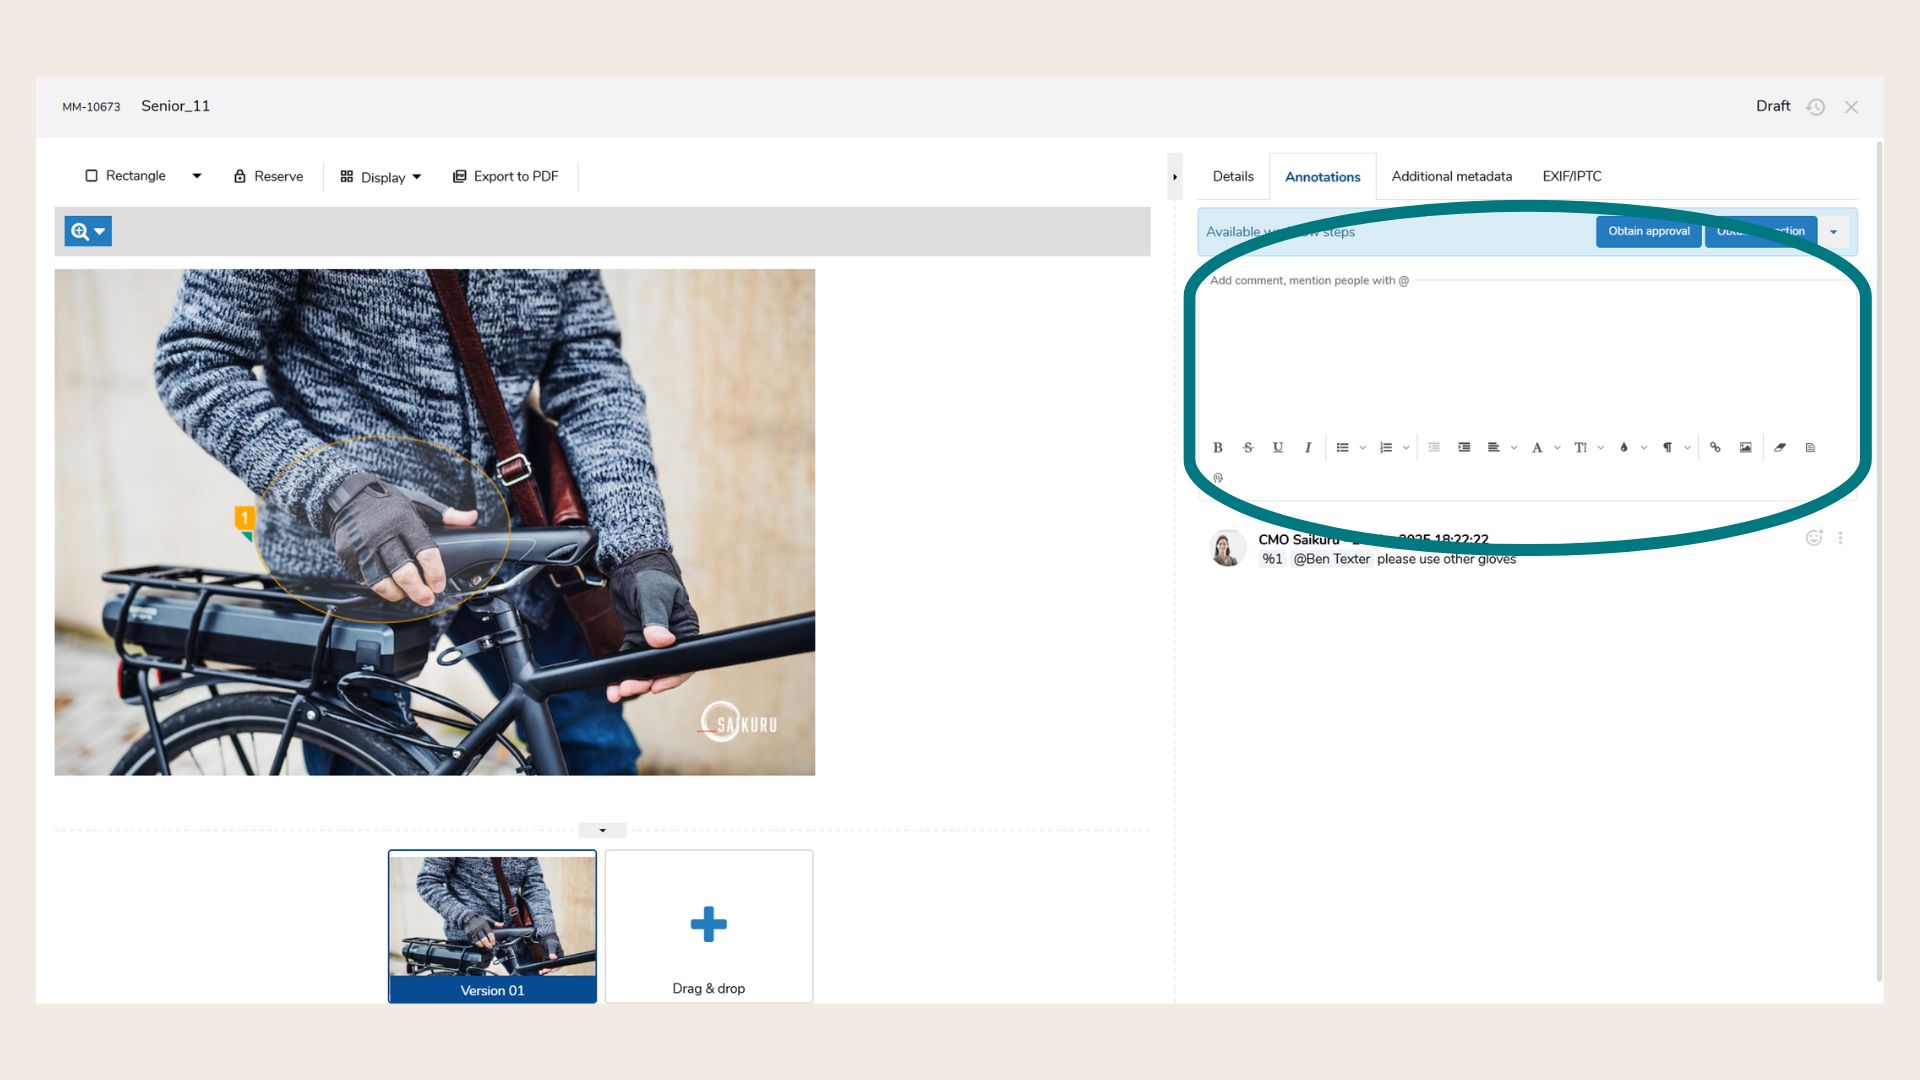
Comments
The comment function is contained in numerous elements in Marmind. So there is the possibility to comment on each object.
-
Add comments to any Marmind object (e.g., campaigns, actions, budgets, to-dos).
-
Tag users with
@mentionto notify them and bring them into the conversation. -
Reply to existing comments for threaded discussions.
-
Track discussions chronologically to maintain context and decision history.
-
Attach files (optional, if enabled) for better communication.
-
Filter and search comments related to specific topics or users.
To find the details in a specific object, navigate to the object, the Details module, and scroll down to the comments:
Also, you can find the comments option in other views, like the Asset view:
Custom Panels
Custom panels allow you to display company-specific information in a structured way. They are made up of fields and groups and can be customized to fit your needs.
The following paragraphs focus on how to set up and use these panels, particularly how to configure mutations.
Setting Up a Custom Panel (Create and Configure Mutations)
When a new object (e.g., a campaign) is created, the corresponding custom panel defined in the settings appears. It includes all the relevant groups and fields.
The appearance and behavior of the panel depend on two configuration options:
-
Auto populate: Should always be enabled. It ensures the panel appears automatically when the object is created.
-
Mutation required: If enabled, a mutation must be created manually for the panel to be used.
Panel Behavior Summary
|
Auto Populate |
Mutation Required |
Behavior |
|---|---|---|
|
✅ Yes |
❌ No |
Panel is available automatically without any extra configuration. |
|
✅ Yes |
✅ Yes |
Panel must be configured via mutation before it can be used. |
What is a Mutation?
A mutation is like a tab within the custom panel. It can contain multiple groups and fields. You need to create a mutation when it’s required by the panel configuration.
How to Create a Mutation
-
Open the campaign or object.
-
Go to the Details tab.
-
Click the pencil icon on the right side of the panel header.
-
In the pop-up “Create and configure mutations”:
-
Enter a name for the mutation
-
Select the groups you want to include
-
To create more than one mutation, click “Add new mutation”
-
Click Save when finished
-
Working with Favorites
If you use certain mutations regularly, save time by creating favorites.
-
Hover over an existing mutation.
-
Click the star icon to open the "Create favorite" dialog.
-
Give the favorite a name and click Save.
-
Switch to the Favorites tab.
-
Adjust the name and groups if needed.
-
Hover over a favorite and click the arrow icon to create a mutation from it. You can use a favorite multiple times.
Viewing the Panel
Once saved, your configuration appears in the panel:
-
Mutation name
-
Assigned groups
-
Defined fields
History and Comments
Each element in the custom panel has its own change history:
-
The panel
-
Each activated mutation (green)
-
Each group
-
Each field
You can also comment on individual fields using the 💬 icon:
-
Yellow speech bubble = already commented
-
Comments support rich text formatting
Field Types
For quick reference, here is a list of available field types:
|
Field Type |
Optional Restriction |
Presentation & Function |
|---|---|---|
|
Asset |
Limitation of the permitted file formats |
“Reference existing asset” and “add external link” |
|
AssetLink |
n.a. |
“upload new asset” and “reference existing asset” |
|
Boolean |
n.a. |
Checkbox |
|
Calculated |
n.a. |
Display of read-only data based on other input fields and/or calculations |
|
DataTable |
n.a. |
Data-Grid as input format |
|
DateTime |
n.a. |
Date field with calendar selection |
|
Description |
n.a. |
Read only description text |
|
Image |
Limitation of the permitted file formats |
Upload of assets in the appropriate file format (e.g. .png) and display of the asset |
|
Lookup |
Mapping of custom lookup; single or multiple selection |
Drop-down list with single or multiple selection of user-defined values |
|
Multiline Richtext NEW |
max. number of characters |
Text/Image input field formatting options |
|
Number |
min. and max. value; max. decimal places; number format
|
Number that can be entered according to the range. Negative numbers are also possible. |
|
Text (single line) |
max. number of characters |
Text-only input with no formatting options |
|
TextArea (multiline) |
max. number of characters |
Text-only input with no formatting options |
|
TextLink |
n.a. |
Text line in which link addresses can be entered |
|
Video |
Limitation of the permitted file formats |
Upload of assets in the appropriate file format (e.g. .mp4) and display of the asset |
❓ FAQs